klik disini :
Kamis, 09 Desember 2010
Converter VGA to Composite
VGA to RGB + composite sync -converter
Designed by Tomi Engdahl
Designed by Tomi Engdahl
This article consists of one circuits which I have designed for connecting VGA card to other display devices than just a VGA monitor. This circuits makes it possible to connect your VGA card to fixed frequency monitors and video projectors. For some applications and system combinations some additional software is needed to get the system working.
I keep all the rights to this circuit. You can freely build this circuit for your own use but you are not allowed to use those circuit designs commercially without written permission from the designer.
VGA to RGB + Composite Sync converter
First circuit is for connecting VGA card to video projector or a monitor which accept VGA card frequencies and has RGB + Composite sync input. This circuit has been succesfully used with Electrohome Projection Systems ECP 4100 data and video projector.
This circuit is designed for converting normal VGA signals standard RGB signals and composite sync signal. The circuit is quite simple, because RGB signal ouput from VGA card is already standard 0.7Vpp to 75 ohm load.
For sync signals there is a circuit which combines horizonal and vertical sync signals to form composite sync singals. The circuit is simply based on one TTL chip with four XOR ports, two resistors and two capacitors. TTL chip ws logical choise because VGA sync signals are TTL level signals.
The sync signal combiner has a system to adjust to different sync polarities so that it always makes correct composite sync signals. VGA card uses different sync signal polarities to tell the monitor which resolution is used. This circuit adjusts to sync signal polarity changes in less than 200 milliseconds, which is faster than setting time of a normal VGA monitor in the display mode change.
Analogue composite sync signal converter
First circuit is for connecting VGA card to video projector or a monitor which accept VGA card frequencies and has RGB + Composite sync input (1 Vpp signal level, 75 ohm input impedance).

This picture is available in GIF and Postscript versions.
Note: The circuit diagram does not show the wire giving power to IC1. The +5V power is connected to pin 14 and ground is connected to pin 7.
This circuit has been succesfully used with Electrohome Projection Systems ECP 4100 video projector in many VGA and SuperVGA modes. The circuit have been also used succesfully with one old Barco video projector using my VGA to TV drivers to get the VGA card to generate suitable signal frequencies which that old video projector can handle.
Component list
C1 22 uF 10V electrolytic
C2 22 uF 10V electrolytic
R1 2.2 kohm
R2 2.2 kohm
R3 1.8 kohm
R4 1.8 kohm
R5 2.7 kohm
R6..R8 47 ohm
U1 74LS86 or 74HCT86
T1 BC 547
T2 BC 547
TTL level sync signal
Many computer monitors have been designed to accept TTL level sync signals. If you happen to own a monitor which uses TTL level sync signals the circuit above does work with with it, because the sync signal level from that circuit is not enough for the monitor. I have designed another simpler circuit for monitors which need TTL levels.

Note: The circuit diagram does not show the wire giving power to IC1. The +5V power is connected to pin 14 and ground is connected to pin 7.
This circuit is basically the same as the first circuit. The only only difference is that the transistor driver stage have been left out from the circuit, because not so much driving capacity is needed and TTL levels signals from the IC are what is wanted. Because the 74LS86 IC directly drives the output without any further buffering, it is only suitable for driving high impedance (1 kohm or more) sync inputs.
Component list
C1 22 uF 10V electrolytic
C2 22 uF 10V electrolytic
R1 2.2 kohm
R2 2.2 kohm
U1 74LS86 or 74HCT86
Simple sync combining BOX
Sometimes you want to use a ready-made BNC cable made for connecting VGA card to high quality monitor. Those BNC cables have 5 BNC outputs with following functions:
Signal Function Color in cable
---------------------------------------
R Red Red
G Green Green
B Blue Blue
H/HV Hsync(+Vsync) Black
V Vsync White or Gray
Tha cables are usually built (should be built!) from high quality 75 ohm coaxial cable and 75 ohm BNC conenctors to guarantee good image quality. You can see a typical schematic of commercial VGA to BNC cable below:

This kind of cable can be used with monitors with 5 BNC inputs. But if you unfortinately have a monitor with RGB and composite sync inputs only, that cable might not be of any use, unless your graphics card can generate composite sync signals (this is not a standard option). If you cna get composite sync directly from graphics card, then it is enough to just connect the H/HV connector to the composite sync pinput of the monitor.
If you are on unfortunate person who deos not have this kind of graphics card or your drivers don't allow using that option, then your only choice is to build a circuit which combines the separate HSYNC and VSYNC signals to composite sync. You can see this kind of circuit below.
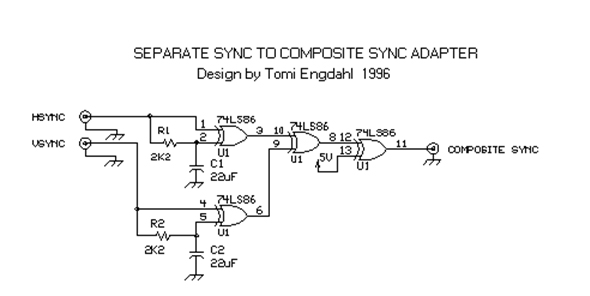
Component list
C1 22 uF 10V electrolytic
C2 22 uF 10V electrolytic
R1 2.2 kohm
R2 2.2 kohm
U1 74LS86 or 74HCT86
Connecting VGA to Sync-on-Green monitor
Some monitors use sync-on-green syncronization instead of separate sync. In that case you can't used my circuits directly. You have to modify those circuits to add Sync-on-Green capability. Generating sync signals to screen picture component is quite easy. I have not had any need for such a circuit, so I haven't designed such option. Check this article to get the idea what to add to my circuits. For more complete explanation how to deal with sync on green monitors, check the Sync on Green FAQ.
Building the circuit
The circuit is quite simple to built if you have basic skills in building electronic circuits. The electronics of the circuits can be easily built to a small piece of veroboard so no special circuit board is necessarily needed (I used this approach in my prototype). I have designed a circuit board for my VGA to TV converter and this same PCB design (GIF picture scanned at 300x300 dots/inc resolution, also available in zipped postscript file format) and component layout can be used with this project also. Note that there are some differences in connection of the IC U1 pins in PCB compared to the schematic, but the circuit built to this PCB fuctions in the same way.
The circuit need well-stabilized power +5V power source (+/- 5%). The circuit takes less than 150 mA current, so you don't need a large power supply. If you don't have anythign suitable avalable, you can always use a small general purpose wall transformer and a small +5V voltage regulation circuit. Another option is to take the +5V power from PC using methods explained in my How to get power from PC to your circuits document.
The wiring should be made carefully and 75 ohm coaxial cabling for picture signals should be used everywhere, especially if you are going to use this circuit with a high resolution monitor. Signals reclections caused by bad wiring can really mess up your picture quality. I would recommend using metal box, shielded cables and shielded connectors for circuit to keep noise and radio interference minimum.
VGA to RGBS converter component list
U1 74LS86
C1,C2 22 microfarads, 16V
R1,R2 2.2 kohm, 1/4 W
R3,R4 1.8 kohm, 1/4 W
R5 2.7 kohm, 1/4 W
R6,R7,R9 47 ohm, 1/2 W
R8 120 ohm, 1/2 W
T1,T2 BC547B
P1 15 pin SUB-D connector
Output connector:
75 ohm BNC connectors (you need 4 BNC connectors)
Wiring:
Red, Green, Blue and Composite Sync lines should be
wired using 75 ohm coaxial cable.
If you are building my TTL level output model, you can leave out R3-R8 and T1-T2 out of this list.
Getting your equipment to accept signal from PC
Many modern compter monitors are multisync monitors which accedpt easily wide selection of different refresh rates, scan frequencies and resolutions. This same applies to modern data projectors. But many older monitors (monitors not made for PC) and video projectors can't accept the signals your VGA card puts out.
If your video projection system or monitor don't accept VGA scanning frequences you have to get a suitable driver for adjusting your VGA frequencies. For normal VGA modes the horizonal sync frequency is 31250 Hz and vertical sync frequency is 60 or 72 Hz. For information about SuperVGA modes you have to consult you display card adapter technical data.
Another use for the same circuit is to connect to connect VGA card to a large old color monitor from an old workstation. If you manage to set your VGA adapter to generate suitable scanning frequecies for the monitor you have, you can use it with your VGA card. For more information how to do this, check the VGA to workstation monitor FAQ.
How to find fixed frequency monitor technical data
Befor you can start eny useful experimenting have to find out the horizonal frequency and the refresh rates your monitor needs. If you try to use the monitor with wrong frequency signals the monitor does not work properly and some monitors can be damaged if you try to use them at wrong frequency.
Your monitor user's guide technical info section is the first place to check. If that does not help try the manufacturer's website. Monitor databases like The World Wide Web Monitor Database and Apple Macintosh Monitor Database are very useful information sources for getting this information. If you can't find any technical info on the exact monitor you have you might check the information about some very similar monitor model (for example some older revision of that model) and use it as some kind starting point. If you know the computer model where the monitor was connected you can try to look at the technical specs or some FAQ of that computer (if you get to know what kind of signal that computer has sent to monitor you know that the monitor can at least show it).
How to configure Windows
Your video card drivers quite propably has options to set the the screen refresh rate. Check you graphics card manual and driver documents how to adjust those settings (this depends on graphics cards). Try to find a refresh rate and resolution which matches you monitor specifications. Typically the selections in typical drivers are quite limited and many driver's don't have any further options for user customization.
Matrox has added excellent user configurability oprtions for their Millenium and Mystique graphics card Windows 95 drivers. For more information take a look at my info page how to confire Matrox cards to TV frequencies because thet page has also lots of information how to change tha settings and this information is useful if you have to make configuration for some fixed frequency monitor you have.
Configuting Linux XFree86 for fixed frequency monitors
Linux XFree86 has excellent user configurability by editing XF86Config file which has all necessary video card parameters in it and that file can be edited with any ASCII editor. Changing those parameters in gonfiguation file properlu needs some experinece. For more information on configuring XFree86 take a look at Use your old Workstation Monitors with Linux/XFree86 and The Hitchhiker's Guide to X386/XFree86 Video Timing.
How to use old video projectors and TV studio monitors
If you happen to own an old video projector which is capable of displaying only PAL/NTSC/SECAM video picture but has RGB inputs, you might find my signal conversion circuits still useful. You can make your VGA card to generate signal which is suitable for this type of monitos or video projectors using the drivers designed for my VGA to TV circuit. Those drivers are available for standard VGA modes in DOS. Some support is also available for some cards for SuperVGA modes in DOS, Windows and Linux Xfree86.
Other related projects
I have also designed a VGA to TV adapter using this same basic circuit. With some additional software and small modifications this circuit can be used for connecting VGA card to TV equipped with SCART connector.
Kamis, 18 November 2010
iPad MID ANDROID


SPESIFIKASI:

KETERANGAN :
- HARGA TERMASUK ONGKOS KIRIM.
- PENGIRIMAN KITA VIA JNE. BISA MENGUNAKAN YES ATAU REGULER
- PESANAN DI WAJIBKAN ASURANSI.
- PEMBAYARAN BISA VIA BCA DAN MANDIRI
- REKBER OKE
GARANSI :
- GARANSI 2 BULAN SEJAK BARANG DI TERIMA.
- BILA RUSAK DALAM, MASA GARANSI, KONDISI MASI MULUS, SEGEL TIDAK JEBOL, TIDAK KENA CARIAN. BARANG KITA GANTI UNIT BARU.TANPA HARUS TUNGGU SERVICE
Rp 1.500.000,-
Senin, 01 November 2010
M-key v2 Mobile Ultra-Thin MIDI Keyboard
| ||||||||||||
 | ||||||||||||

MELODIA "NOVATION NOCTURN 25"
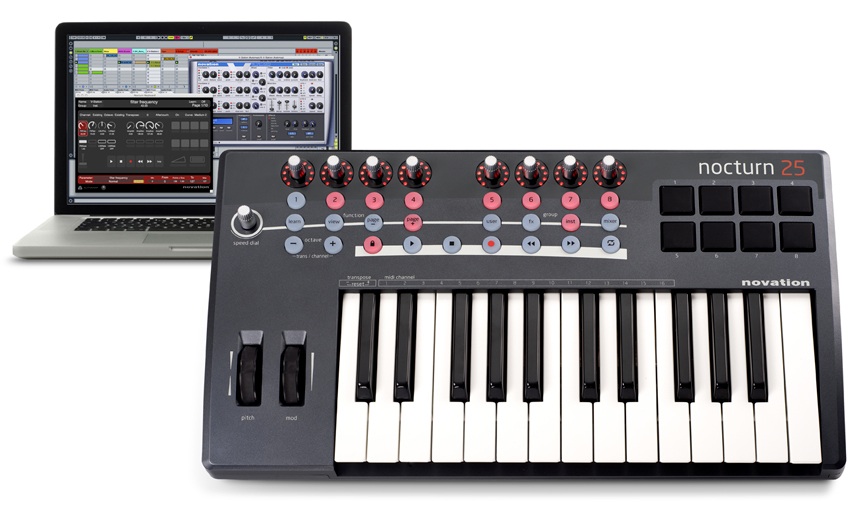
The NOVATION NOCTURN 25 displays control information where you really need it: on your computer monitor. The Automap software graphically displays Nocturn’s control surface, enabling you to assign controllers by simply clicking on them.
Product Details
The NOCTURN 25 tell you what is going on: LED rings around the 8 encoders show their current settings, and LED’s behind the buttons tell you if they are on or off.
At your fingertips are 20 brilliant effects that deliver exceptional colour, unprecedented control and multiple routing options.
The Nocturn Keyboard is based on the control surface of the hugely popular Novation Nocturn. The addition of a keyboard means that Nocturn's spacious controller layout has been adapted as part of a full control solution for DAW users. The latest version of Automap software graphically displays all control information and enables you to assign parameters with a single click.
Nocturn Keyboard has been designed as a musical instrument as well as a control surface. The high-quality Fatar 'Fast Touch' keyboard mechanism, with velocity-sensitivity and aftertouch, allows for more expressive playing styles. There are separate pitch bend and modulation wheels, and 8 velocity sensitive drum pads for sketching drum patterns and triggering samples.
The NOVATION NOCTURN 25 KEYBOARD Main Features Include:
* Velocity-sensitive, keyboard from Fatar, with assignable after-touch. The Nocturn Keyboard feels like playing an instrument rather than a computer peripheral
* Brightly lit 11 segment LED rings around the eight smooth encoders, and backlit buttons throughout provide instant visual feedback for every physical control.
* All 8 oversized encoders are touch sensitive, bringing up mapping information and allowing you to ‘touch’ in automation data on DAW’s with a ‘touch’ mode.
* The 9th encoder is a unique 'Speed Dial' which allows you to instantly change the value of any parameter the cursor is pointing at, with no assignment needed whatsoever.
* Nocturn Keyboard features 8 'softfeel' velocity sensitive drum pads. These can do more than just trigger notes and sketch drum patterns, all can be assigned to control software parameters.
* 8 trigger pads, 8 dials, 14 buttons, modulation wheel. Sustain and expression pedal control can also be added.
* Separate pitch and modulation wheels - the modulation wheel can be assigned (like the other controls) to software parameters through Automap.
* Nocturn Keyboard is powered by USB saving valuable plug sockets. It can also be powered down without being unplugged, preserving battery power in laptops.
* Automap software comes bundled free with Nocturn Keyboard
Rabu, 27 Oktober 2010
Sabtu, 23 Oktober 2010
ISTILAH DALAM BROADCAST
Akting :Sebuah proses pemahaman dan penciptaan tentang perilaku dan karakter pribadi dari seseorang yang diperankan.
Audio Visual :Sebutan bagi perangkat yang menggunakkan unsur suara dan gambar.
Art Director : Sebutan bagi pengarah seni artistik dari sebuah produksi.
Asisten Produser : Seseorang yang membantu produser dalam menjalankan tugasnya.
Audio Mixing : Proses penyatuan dan penyelarasan suara dari berbagai macam jenis dan bentuk suara.
Angle : Sudut pengambilan gambar.
Animator : Sebutan bagi seseorang yang beprofesi sebagai pembuat animasi.
Audio Effect : Efek suara.
Ambience : Suara natural dari objek gambar.
Broadcaster : Sebutan bagi seseorang yang bekerja dalam industri penyiaran.
Background : Latar belakang.
Blocking : Penempatan objek yang sesuai dengan kebutuhan gambar.
Bridging scene : Adegan perantara diantara adegan – adegan lainnya.
Back Light : Penempatan lampu dasar dari sudut belakang objek.
Breakdown Shoot : Penentuan gambar yang sesuai dengan naskah atau urutan acara.
Bumper In : Penanda bahwa program acara TV dimulai kembali setelah iklan komersial.
Bumper Out : Penanda bahwa program acara TV akan berhenti sejenak karena iklan komersial.
Credit Title : Urutan nama tim produksi dan pendukung acara.
Chroma Key : Sebuah metode elektronis yang melakukan penggabungan antara gambar video yang satu dengan gambar video lainnya dimana dalam prosesnya digunakan teknik Key Colour yang dapat diubah sesuai kebutuhan foreground dan background.
Cutting on Beat : Teknik pemotongan gambar berdasar tempo.
Clip Hanger : Sebutan bagi adegan atau gambar yang akan mengundang rasa ingin tahu penonton tentang kelanjutan acara, namun harus ditunda karena ada jeda iklan komersial.
Cut : Pemotongan gambar.
Cutting : Proses pemotongan gambar.
Camera Blocking : Penempatan posisi kamera yang sesuai dengan kebutuhan gambar.
Clear – Com : Sebutan bagi penggunaan head-set audio yang dihubungkan dengan ruang master control.
Channel : Saluran.
Crazy Shot : Gambar yang direkam melalui kamera yang tidak beraturan.
Compotition : Komposisi.
Continuity : Kesinambungan.
Cross Blocking : Penempatan posisi objek secara silang sesuai dengan kebutuhan gambar.
Crane : Katrol khusus untuk kamera dan penata kamera yang dapat bergerak keatas dan kebawah.
Clip On : Mikrofon khusus yang dipasang pada objek tanpa terlihat.
Casting : Proses pemilihan pemain lakon sesuai dengan karakter dan peran yang akan diberikan.
Close Up : Pengambilan gambar dari jarak dekat.
Desain Compugrafis : Rancangan grafis yang digambar melalui tekhnologi komputer.
Durasi : Waktu yang diberikan atau dijalankan.
Dimmer : Digunakan untuk mengontrol naik turunnya intensitas cahaya.
Disc Jokey : Sebutan bagi pembawa acara musik yang menayangkan video Klip.
Dissolve : Tekhnik penumpukan gambar pada editing maupun syuting multi kamera.
Depth of Field : Area dimana seluruh objek yang diterima oleh lensa dan kamera muncul dengan fokus yang tepat. Biasanya hal ini dipengaruhi oleh jarak antara objek dan kamera, focal length dari lensa dan f-stop.
Dialogue : Percakapan yang muncul dalam adegan.
Dramatic Emotion : Emosi gambar secara dramatis.
Editing : Proses pemotongan gambar.
1. Ending Title : Urutan nama yang dicantumkan pada akhir movie.
Engineering : Sebutan bagi pengerjaan dan pembagian kerja dalam masalah teknis penyiaran.
Establish Shot : Gambar yang natural dan wajar.
Extreme Close Up : Pengambilan gambar dari jarak sangat dekat.
Focus : Penyelarasan gambar secara detail, tajam, dan jernih hingga mendekati objek aslinya.
Final Editing : Proses pemotongan gambar secara menyeluruh.
Floor Director : Seseorang yang bertanggung jawab membantu mengkomunikasikan keinginan sutradara, dari master kontrol ke studio produksi.
Filter Camera : Filter yang digunakan untuk kamera.
Footage : Gambar – gambar yang tersedia dan dapat digunakan.
Hunting Location : Proses pencarian dan penggunaan lokasi terbaik untuk syuting.
Headset : Digunakan untuk dapat mendengarkan suara sutradara.
Hand held : Tekhnik penggunaan kamera dengan tangan tanpa tripod.
Image : Simbol yang sesuai objek.
Jumping Shot : Proses pengambilan gambar secara tidak berurutan.
Jimmy Jib : Katrol kamera otomatis yang digerakkan dengan remote.
Job Description : Deskripsi tentang jenis pekerjaan.
Jeda Komersial : Saat penayangan iklan komersial diantara acara televisi.
Job Title : Penamaan jabatan pada pekerjaan.
Konservatif : Serba teratur, tertib, dan apa adanya.
Kreator : Sebutan bagi seseorang yang menciptakan karya kreatif.
Lighting : Penataan cahaya.
Lighting Effect : Efek dari penataan cahaya.
Lensa Wide : Digunakan untuk memperbesar sudut pandang pengambilan gambar dari kamera.
Lensa Super Wide : Digunakan untuk sangat memperbesar sudut pandang pengambilan gambar dari kamera.
Long Shot : Gambar yang direkam dari jarak yang jauh. Biasanya digunakan dengan cara pengambilan gambar dari sudut panjang dan lebar.
Master Control : Perangkat teknis utama penyiaran untuk mengontrol proses distribusi audio dan video dari berbagai input pada produksi untuk siaran live show maupun recorded.
Magazine Show : Rancangan acara dengan format majalah.
Main Object : Target pada objek utama.
Medium Close Up : Pengambilan gambar dari jarak cukup dekat.
Medium Shot : Gambar yang diambil dari jarak sedang.
Medium Long Shot : Pengambilan gambar dari jarak yang panjang dan jauh.
Monitor : Digunakan untuk memantau gambar.
Master Video : Video utama berisikan rekaman acara televisi yang siap untuk
ditayangkan maupun disimpan.
Multi Camera : Sistem dari tata produksi audio visual yang syuting secara bersamaan dengan menggunakan sejumlah kamera.
Middle Close Up : Pengambilan gambar dari jarak sedang.
Master Shot : Gambar pilihan utama dari sebuah adegan yang kemudian dijadikan referensi atau rujukan saat melakukan editing.
Langganan:
Postingan (Atom)